- Loading...
You can install this software as either:
A no obligation, fully functional demo that prints a limited number of sample forms.
A fully installable licensed version, after you obtain your Activation Code.
Note: If you've already purchased your software, you can find your Activation Code at the bottom of your paid invoice or packing slip.
Single user install
- Visit the support download site and download the full install for your desired software.
Double-click on the exe file to begin the installation. If User Account Control informs you that the Setup program wants to access your computer, click Continue to proceed with the installation. Contact your IT department if you are prompted for an elevated login.
The Installation Wizard will guide you through the install.
When prompted, enter your Activation Code, which begins with a letter. If you do not have an Activation Code, type in the word “DEMO".
Roll Forward Option: You will be prompted to copy your Filer, Recipient, Security, Transmitter, and/or Import Map information from your 20XX software. Make the appropriate selections and click NEXT.
Once the install is complete, and if you selected the Roll Forward Option in Step 5, you can select your Tax Year 20XX Filers on the Select Filer screen. You can browse for Tax Year 20XX Recipients when your cursor is in the TIN field of any blank form being entered onscreen. Press the <F2> key or right click your mouse to view your Recipients.
Multi user install
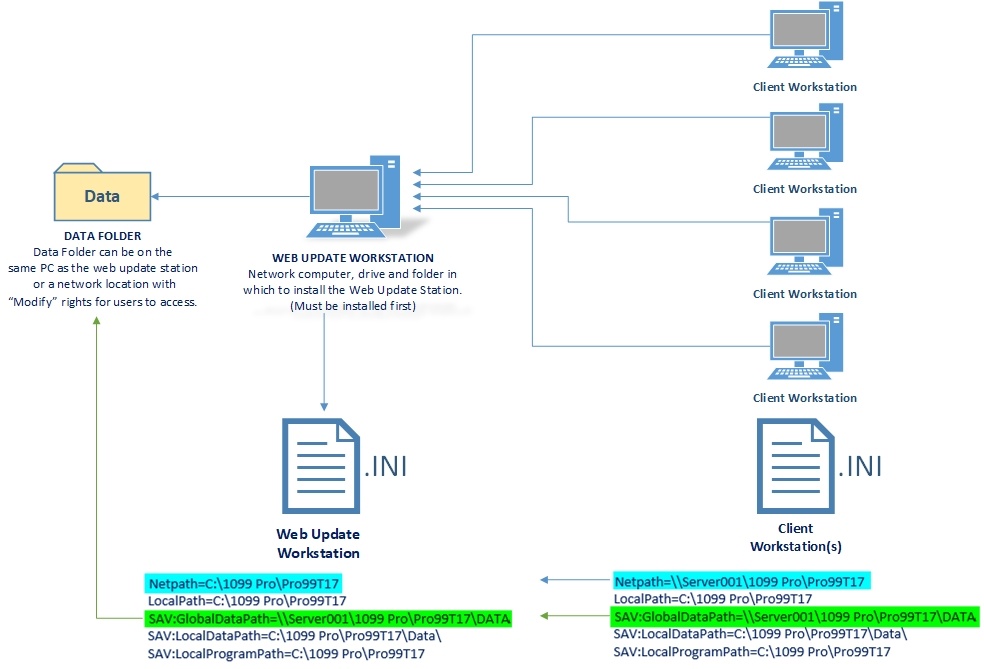
For Multi-user installations, one machine must be designated as a Server and all others as Workstations. The Server can be any Windows machine on the network, or, you can have a local or remote drive accessible by all computers that will function as Workstations.
Install the Server:
Determine the network computer, drive, and folder where you want to install your software. All Workstations must have full rights to this folder.
Install your software on the network computer to be designated as the Server. When prompted, enter your Multi-User Activation Code. Select Server Installation as the Install Type. The program files should be put on the local or remote drive.
After successfully installing your software to the network, click on the 1099/W-2/1042-S icon on your desktop. The Getting Started Wizard will walk you through setting up the software. By default, Audit Trails are enabled and Security* is disabled.
After completing the Getting Started Wizard, re-launch your software. Administrators should use "Administrator" for the User ID and "NEW" as the Password to log on for the first time with Security enabled. The Administrator should create users and assign rights before installing 1099/W-2/1042-S Pro on Workstations.
* You are encouraged to enable Security. If Security is disabled, any user on any workstation can access your software and view/modify Administrator settings and all data. This includes the potential for anyone to make themselves an Administrator and lock you out of the software.
Install the Workstation:
Open the server installation and set the Security On or Off before proceeding.
Install the Server before installing Workstations.
Locate the Server installation drive and folder from the Workstation. To map the Server installation’s network drive from a Workstation, open Windows Explorer from each Workstation. Locate the network drive, right click your mouse, and select Map Network Drive. Each installation will refer to this drive as the Global Data Path.
Install your software on the Workstation. When prompted, enter your Multi-User Activation Code. Select Workstation Installation as the Install Type. Browse for the network drive and folder of the Server installation (e.g., X:\1099 Pro\Pro99TXX\ where “X” is the mapped Network Drive). The program files should be put on the local drive (e.g., C:\1099 Pro\Pro99TXX).
If the Administrator enabled Security, then the Workstation is deemed a “user.” After first entering your software at the Workstation, a User ID (as assigned by the Administrator) is required. For the Password, enter “NEW”. You must then create a unique password.
External Networking Ports used by 1099 Pro:
| Service Bureau Uploads | Software Updates | News/Help Updates |
|---|---|---|
|
|
|
*A PDF copy of this document can be downloaded here: Installation Instructions
Overview
Content Tools