- Loading...
Corporate Suite Exclusive Feature
Use the Reprint Tax Forms Wizard to create a PDF file for each form type containing successfully processed entries. In addition, a .TXT file is created which details all failed entries. This is a subwizard of the Scheduled Job Wizard.
PREREQUISITES - ReprintScheduler.exe.CONFIG must be configured. CONFIG file is located in \Pro99CS\Tools\. You can also download a copy here: ReprintScheduler.exe.Config
- Line 9 - <add name="CSDb" connectionString="server\instance;uid=sqluser;password=sqluserpassword;initial catalog=dbname;" providerName="System.Data.SqlClient" />
- Line 21 - <add key="symmetricKey" value="A base64 encoded 256-bit key" />
- Line 22 - <add key="symmetricVector" value="A random 40 character string" />
| PowerShell Script: Generate 256-bit AES key | PowerShell Script: Generate 40 character string |
|---|---|
PS C:\temp> $256AESKey = New-Object Byte[] 32 | PS C:\temp> -join (((48..57)+(65..90)+(97..122)) * 80 |Get-Random -Count 40 |%{[char]$_}) ZzVQEny0WlNARKb5DJ1CGJY59c4aDCxCrADfmRBh |
Examples:
<add key="symmetricKey" value="FJ1WZ3FnsP9pUIPRgTJ2Kw1E2Th4/9mGubZmobUuWoo=" />
<add key="symmetricVector" value="ZzVQEny0WlNARKb5DJ1CGJY59c4aDCxCrADfmRBh" />
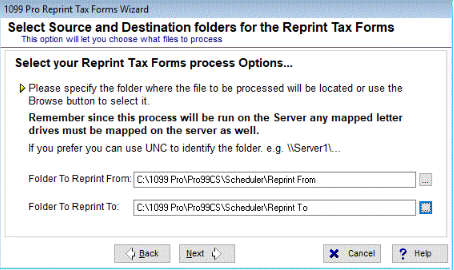
Reprint Tax Forms Wizard
Only Administrators and Users with rights can access the Scheduler and manage Scheduler jobs. The specifications for the reprinted tax forms are set in the Reprint*.TXT file; which must be manually created by the user prior to this process. See File Format Conventions below.
- From within the Scheduled Job Wizard, choose "Reprint Tax Forms”.
- Enter the name of Job, Initial Start date and Time as well as any dependencies (jobs that must be completed prior to this one).
- Select Job Frequency Detail to set the frequency of jobs.
- At the Reprint Tax Forms Parameters & Email Alerts screen, click the "Add" button.
- In the Reprint Tax Forms Wizard review important onscreen information. Click "Next" to continue, go "Back" at any time.
- At the Select Source and Destinations Folders screen, the designated Folder to Reprint From must include the user's Reprint*.TXT file. All generated files are placed in the user designated Folder to Reprint To.
- This is a Server run process; please map letter drives or use UNC to identify the folder.
- IMPORTANT: If the designated Folder to Reprint From contains more than one Reprint*.TXT file, ALL files will be automatically processed.
- Specify Email Settings. This individual receives email notification when the process is completed, failed or canceled.
- A maximum file size for attached reports can be set. To attach reports to email notification requires specific Email Server and Account Settings. See onscreen details.
- At the Ready to Reprint Tax Forms screen review settings and click "Finish" to save Reprint Tax Forms settings and return to the Scheduled Job Wizard.
File Format Conventions
Prior to running the Reprint Tax Forms wizard, users must set reprint specifications in the Reprint*.TXT file. Users must manually create a .TAB delimited text file, in the following naming convention: Reprint_MMDDYYYY_Seq#.TXT, e.g., Reprint_03072016_Seq123456.TXT. Here is an sample: Reprint_11082023_Seq1.txt
Text File Format is .TAB delimited with the following columns: (Header row optional)
- Col 1—Tax Year (e.g., 2016 or 2022)
- Col 2—Form Type
- Col 3—Filer PCode
- Col 4—Recipient TIN
- Col 5—Recipient Account Number
- Col 6—TIN Masking: 0 = No Mask (default), 1 = Mask, 2 = PCode Filer Preference
- Col 7—TaxRecID: Empty/Null = Ignore, Any Other Numeric Value = Match by TaxRecId
- If TaxRecID exists, the following columns are ignored: Column 1 (Tax Year), Column 3 (Filer Pcode), Column 4 (Recipient TIN), & Column 5 (Recipient Account Number)
To submit a text file without any records to be reprinted, use the wording, "NO DUPLICATE [Form Type] TAX FORM REQUESTS". This returns a failed file containing "No Duplicate Tax Form Requests".
Job Parameters - Configuration File Settings
When reprinting tax forms via Scheduler, users can create additional filters by manually editing the ReprintScheduler.exe.Config file. On the Web Update workstation, this file is located in Pro99CS\Tools and can be opened and edited in Microsoft WordPad.
| Setting | Values |
|---|---|
| IncludeOriginal | Default Value—False (if not included in the config file) Possible Values—True / False
Full Text—<add key="IncludeOriginal" value="false" /> |
| IgnoreW2SupersededInformation | Default Value—False (if not included in the config file) Possible Values—True / False
Full Text—<add key="ignoreW2SupersededInformation" value="true" /> |
| AllowBlankTins | Default Value—False (if not included in the config file) Possible Values—True / False
Full Text—<add key="AllowBlankTins" value="true" /> |
| AllowBlankAccounts | Default Value—False (if not included in the config file) Possible Values—True / False
Full Text—<add key="AllowBlankAccounts" value="true" /> |
| ShowDoNotPrint | Default Value—False (if not included in the config file) Possible Values—True / False
Full Text—<add key="ShowDoNotPrint" value="true" /> |
Overview
Content Tools