- Loading...


Click on any of the tabs above.
- No appointment or scheduling is required to use the Service Bureau, you may upload at any time prior to the posted Service Bureau Deadlines for Guaranteed Processing by the respective IRS/SSA deadlines.
- If you have 10,000 or more forms for printing and mailing, a signed Contract and Postage Deposit are required to perform Print Services. If you have 10K or more forms please email sb@1099pro.com to receive the contract and deposit invoice.
- Import your records into 1099 Pro software.
- Run the January software update to enable Service Bureau Upload functionality.
- Use the software's built-in Service Bureau Upload Wizards to generate and submit your records to the Service Bureau.
- Select to submit forms for Print/Mail/eFile, Print/Mail Only, Electronic Delivery, or Online Access services.
- Your encrypted data files and signed Control Totals are digitally transmitted to us - there is no need to phone, email, or fax the Service Bureau.
- Lastly, at the Service Bureau Upload Sessions screen verify that your upload has a Done* status. The Service Bureau will email you within a few hours of receipt of your upload.
* Uploads with a Done (HTTPS) or Done (FTP) status have been submitted to the Service Bureau for processing. Uploads with a Done (Manual) status however, require you to take the additional step of manually posting your upload file on 1099 Pro's secure web site. Review your Upload Confirmation Sheet (see Special Manual Upload Instructions on second page) for guidance. Do not email upload files to the Service Bureau.
- Make any necessary or requested changes to your recipient data.
- Use the software's built-in Service Bureau Upload Wizards to generate and submit your records to the Service Bureau.
- Select to submit forms for Federal eFile &/or NEC State Reporting services.
- Your encrypted data files and signed Control Totals are digitally transmitted to us - there is no need to phone, email, or fax the Service Bureau.
- Lastly, at the Service Bureau Upload Sessions screen verify that your upload has a Done* status. The Service Bureau will email you within a few hours of receipt of your upload.
* Uploads with a Done (HTTPS) or Done (FTP) status have been submitted to the Service Bureau for processing. Uploads with a Done (Manual) status however, require you to take the additional step of manually posting your upload file on 1099 Pro's secure web site. Review your Upload Confirmation Sheet (see Special Manual Upload Instructions on second page) for guidance. Do not email upload files to the Service Bureau.
To learn more, or to get started, contact us!
|
|---|
 If you plan to submit your uploads separately, make sure to upload in order, Printing & Mailing first, Electronically file second.
____________________________________________________________
How can we help?
Click on the plus sign (on the left side) to expand any of the options below.
Uploading your Print & Mail only file via the Service Bureau
NOTE: If you have 10,000 or more forms for printing and mailing, a signed Contract and
Postage Deposit are required to perform Print Services. Please email sb@1099pro.com and
add "CONTRACT" in the subject line to receive the contract and deposit invoice
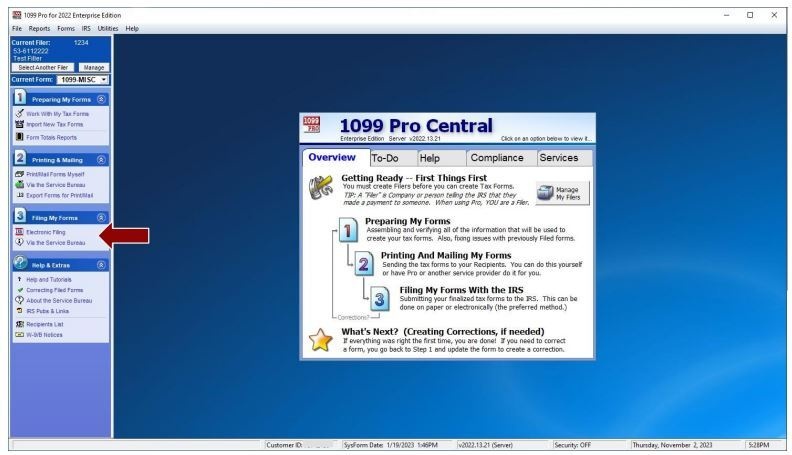
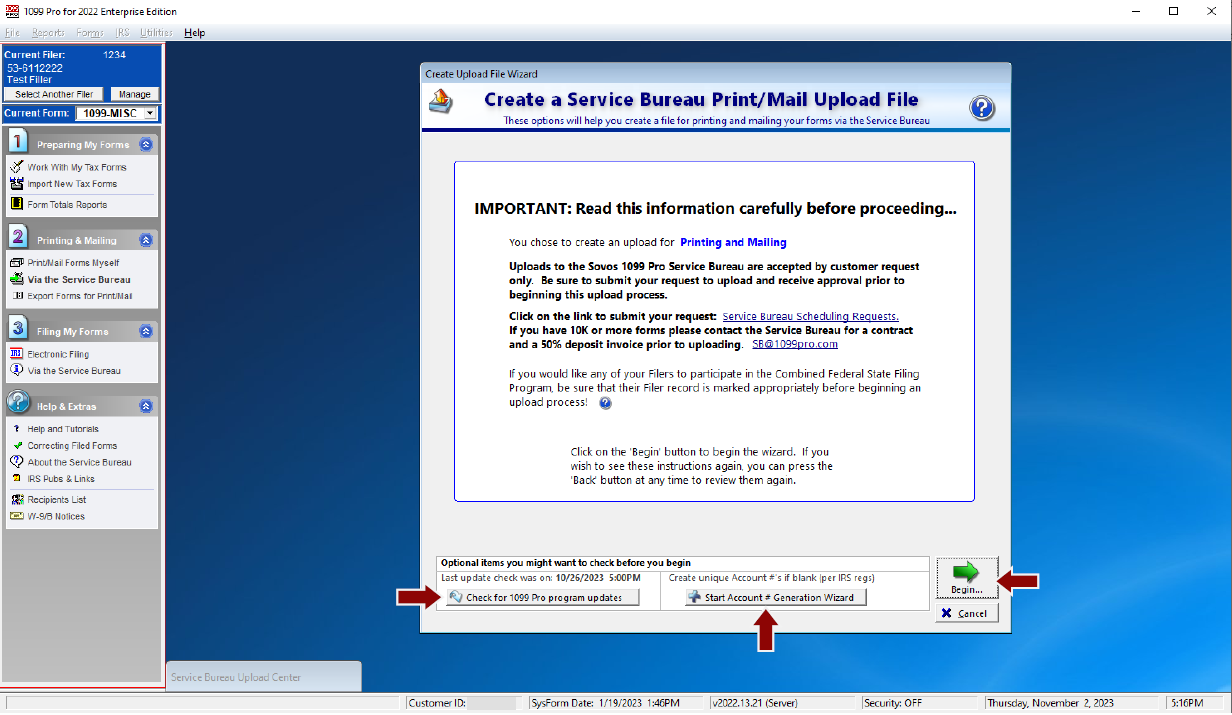
1) Once your forms are imported into your filer and you are ready to upload, click on Via the Service Bureau under step 2. See screenshot below.
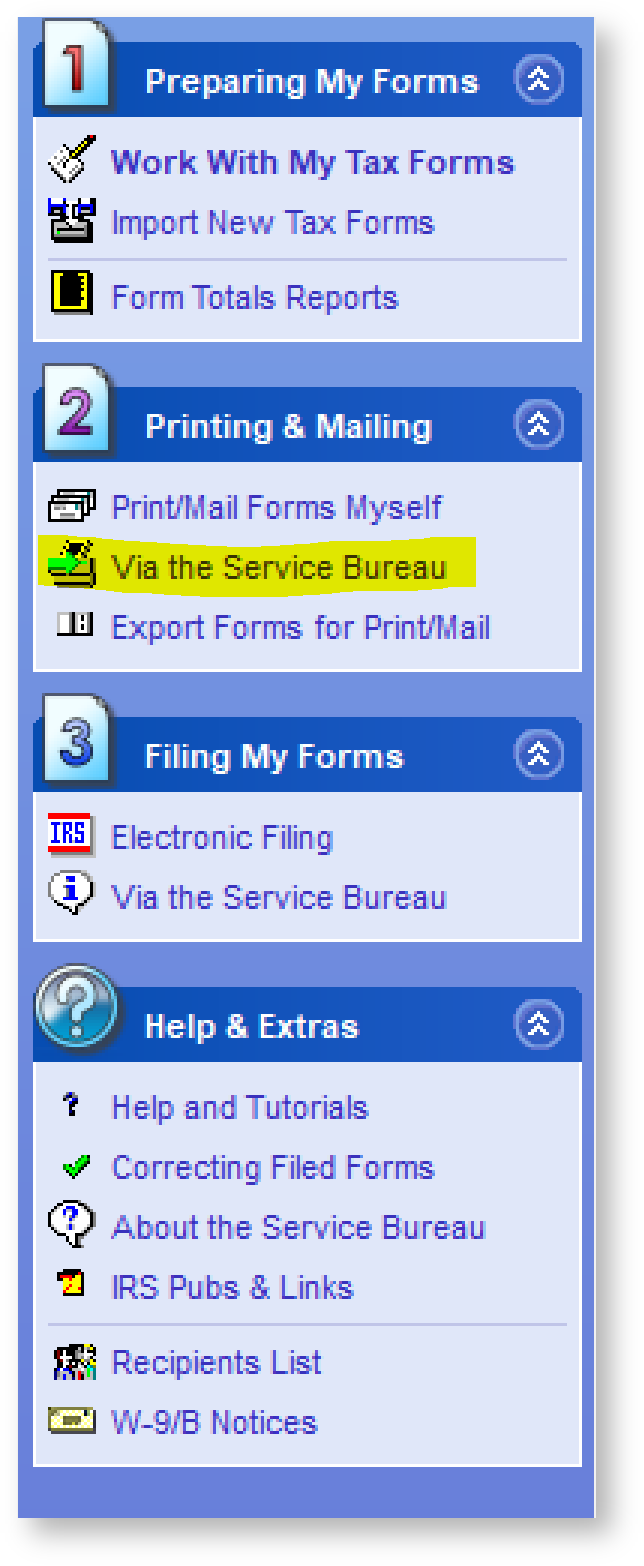
2) Click on Printing & Mailing or E-Delivery Upload
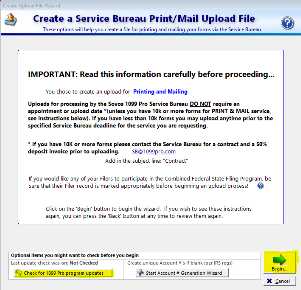
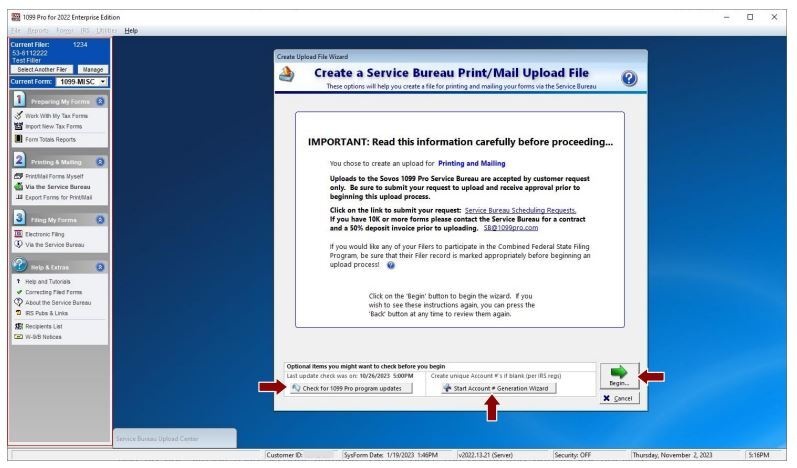
3) Check for updates if you have not already, then click begin.
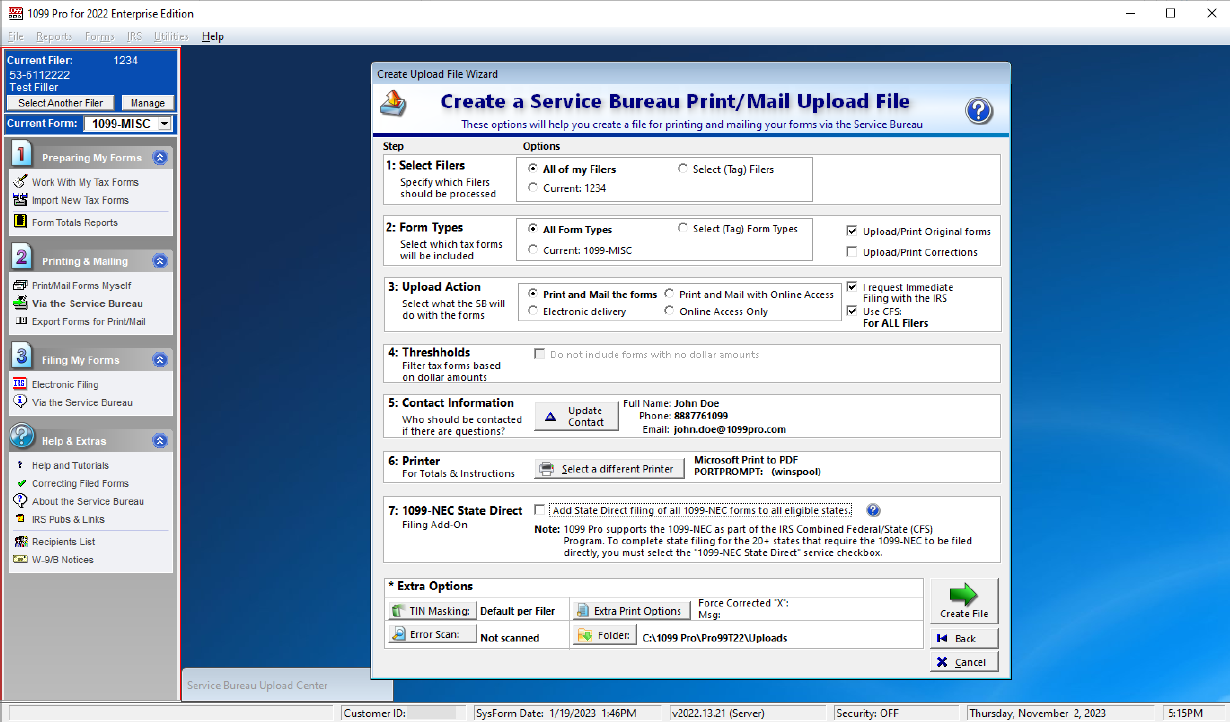
4) By default, only the current Filer is selected for upload. If you would like to upload for all or some of your Filers, change the setting in step 1. Step 2 is for choosing which form types will be uploaded. Make sure you leave Upload/Print Original forms selected on the right. Leave step 3 as is so that your upload is for Print and Mail only. Leave step 4 as is as well. Step 5 is your contact information.
5) To submit your upload, you must click View Control totals Report, confirm the total number of forms, sign with your name, and click Upload my File. Leave transfer method as is unless built in HTTPS fails.
You will now be able to view your uploaded session status 'DONE (HTTPS)' under Service Bureau Upload Session page.
Note: statuses are based on the selection made under the transfer method. We recommend the most secure option, however, if your company has a firewall/high security you might need to select the "FTP" option.
Please allow 24 to 48 hours to receive a confirmation email.
You are DONE with your Print and Mail only submission.
Filing Electronically via the Service Bureau
Before you begin, it is important to update your software to the most current version and you have
imported/manually entered your data into the software. Please refer to this tutorial on how to import.
On the third step labeled 'Filing My Forms”, you should click on the option 'Via the Service Bureau' to proceed with your upload.
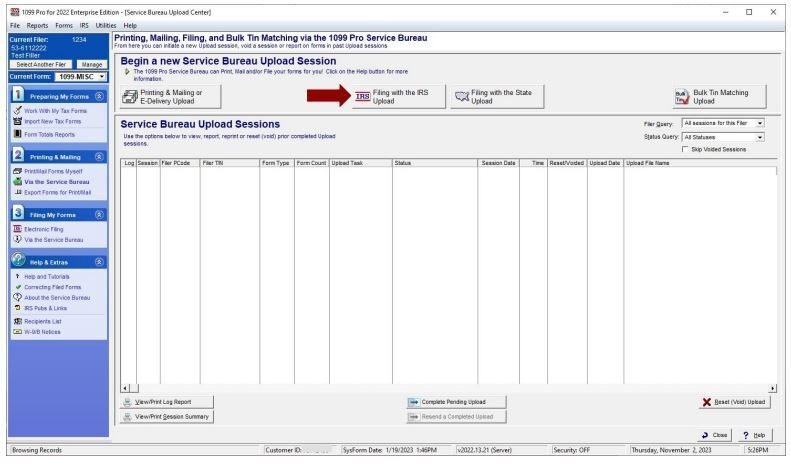
Then click on “Filing with the IRS Upload” to initiate a helpful wizard that will guide you through
the process.
1. Check for Updates: It is essential to ensure that you are using the most up-to-date version of the
software. If there is a software update available, please apply it before proceeding to the next steps.
2. Account Number: The IRS requires that you provide a unique account number on each form. If
you do not already have account numbers, simply press the designated button. For detailed
instructions on how to generate account numbers, you can refer to This Video
3. Click “Begin”: Once you have completed the preceding steps, click the 'Begin' button to continue
with the process.
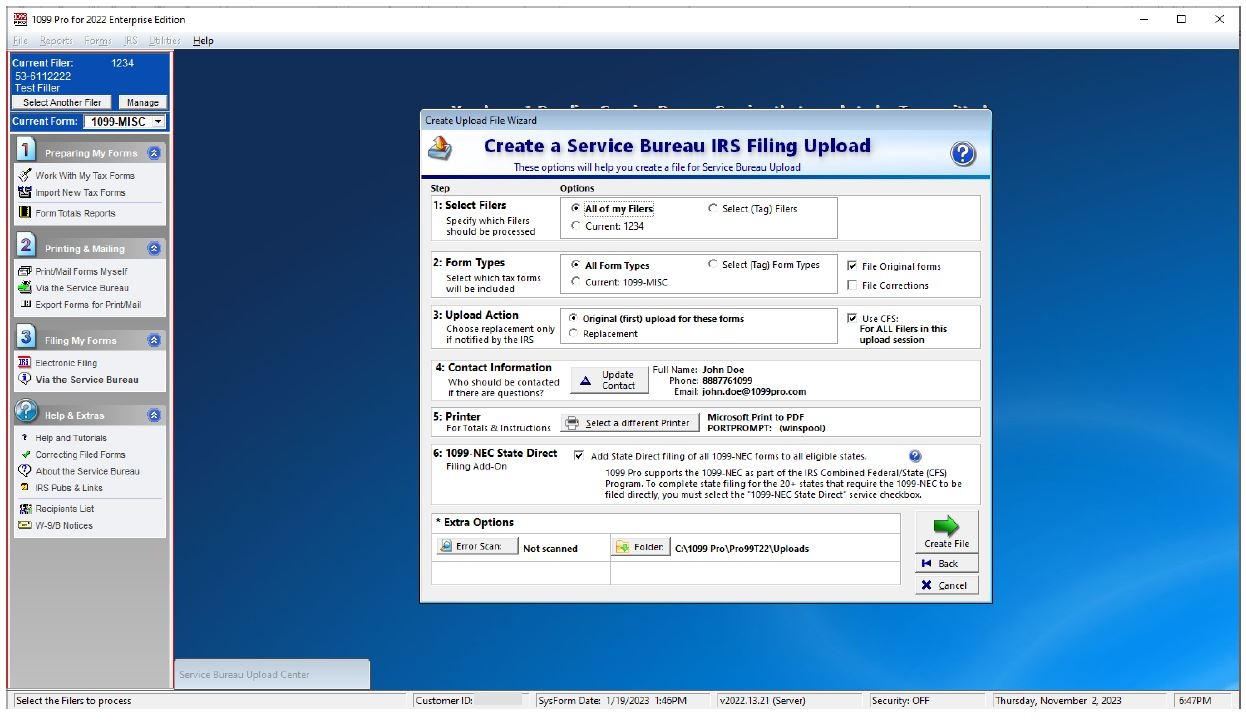
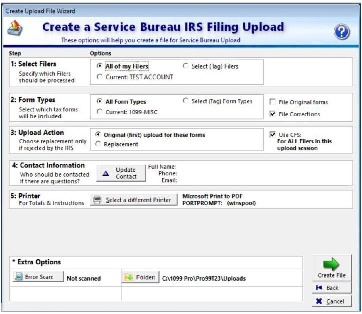
1. Select Filers: Select the filers you wish to upload.
2. Form Types: The Service Bureau recommends selecting all of your filers and all form types.
Also, indicate whether you are sending originals or corrections.
3. Upload Action: Choose the upload action you will be using. If this is the first time you have
uploaded these specific forms to the Service Bureau for filing, select 'Original (first) upload
for these forms.' If you have already uploaded but received a notification from the IRS
explaining that the previous upload was rejected, then select 'Replacement’.

The "Use CFS for all filers in this upload session" option is automatically checked for you,
enabling participation in the Combined Federal/State Filing Program. Click here to read
more about the Combined Federal/State Filing Program.
4. Contact Information: In this step, it is essential to update your contact information.
5. Printer: In this option, you need to select the printer for printing both Totals Control and
Instructions.
6. 1099-NEC State Direct: This option allows you to save time by submitting your data for direct
filing to all eligible states simultaneously.
For more information, refer to "1099-NEC State Direct Reporting".
Extra Options
• Error Scan: this feature will help you to scan your data for common formatting errors.
• Folder: this feature will enable you to choose where your upload will be saved. In most
cases, you will prefer to save your upload to the default location.

Once you have configured your preferences, click on "Create File".
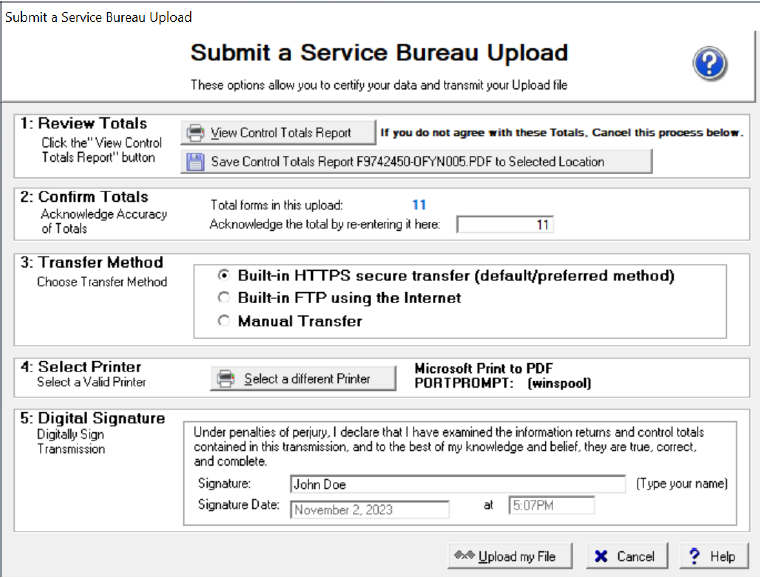
A pop-up screen will appear asking you to confirm your data before uploading to the Service Bureau.
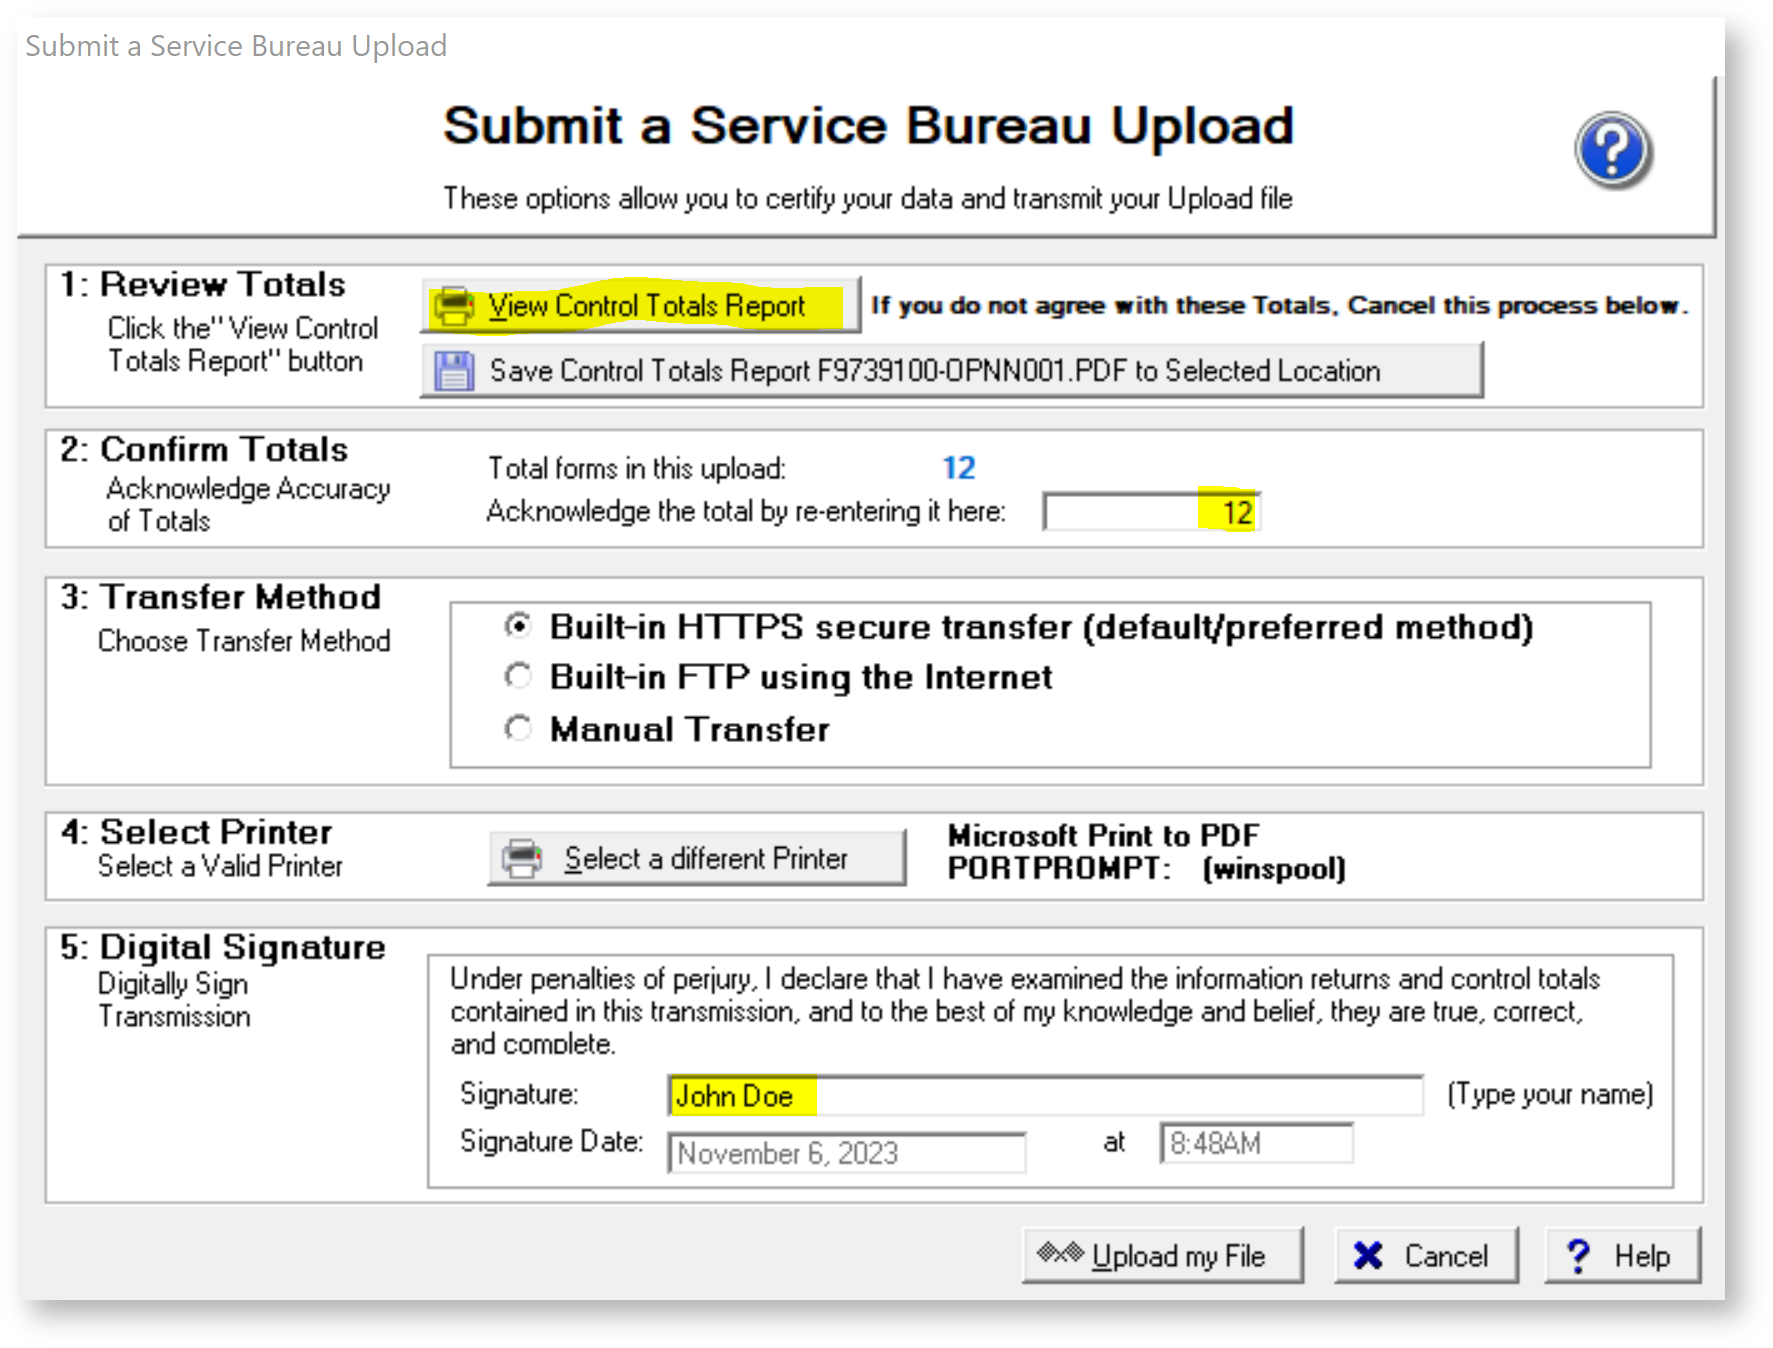
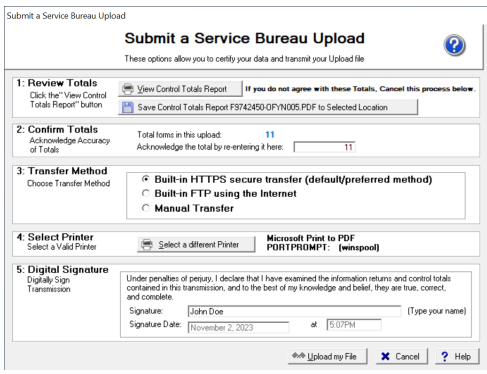
1. Review Totals: Click 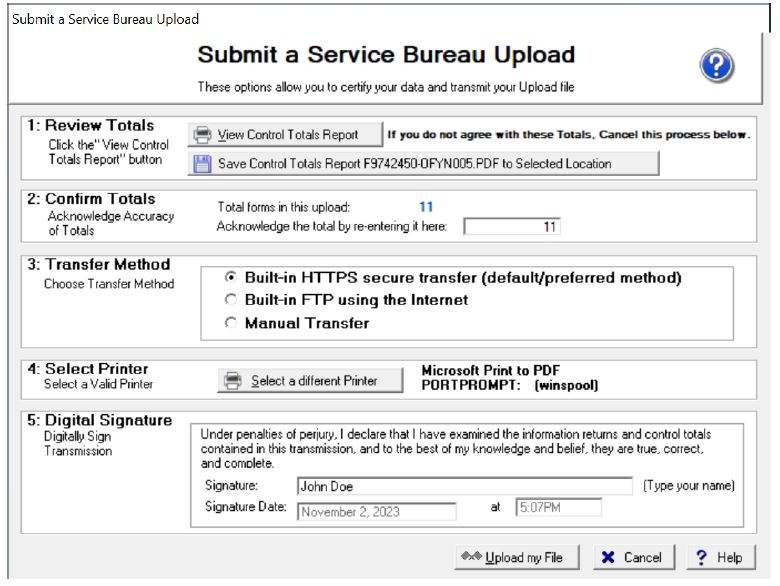 on the "View Control Totals
Report", and your report will
appear in a new window.
Confirm the totals displayed on
the last page. Then, click on
"Save Control Totals
Report..." to save a copy of the
report to your chosen location.
2. Confirm Totals: Reenter
the number of forms you
plan to upload under step 2.
3. Select Your Preferred Upload Method: The Service Bureau recommends using the default
option, "Built-In HTTPS Secure Transfer (Default/Preferred Method)" to securely submit
your data to the Service Bureau over the internet. If the first option fails due to your computer
firewall, you can consider the second option, "Built-In FTP using the internet."
4. Select Printer: Choose the Correct Printer.
5. Digital Signature: Provide your digital signature.
 Press "Upload My File".
Another window will appear, indicating that the file has been successfully uploaded.
Click "OK" to proceed.
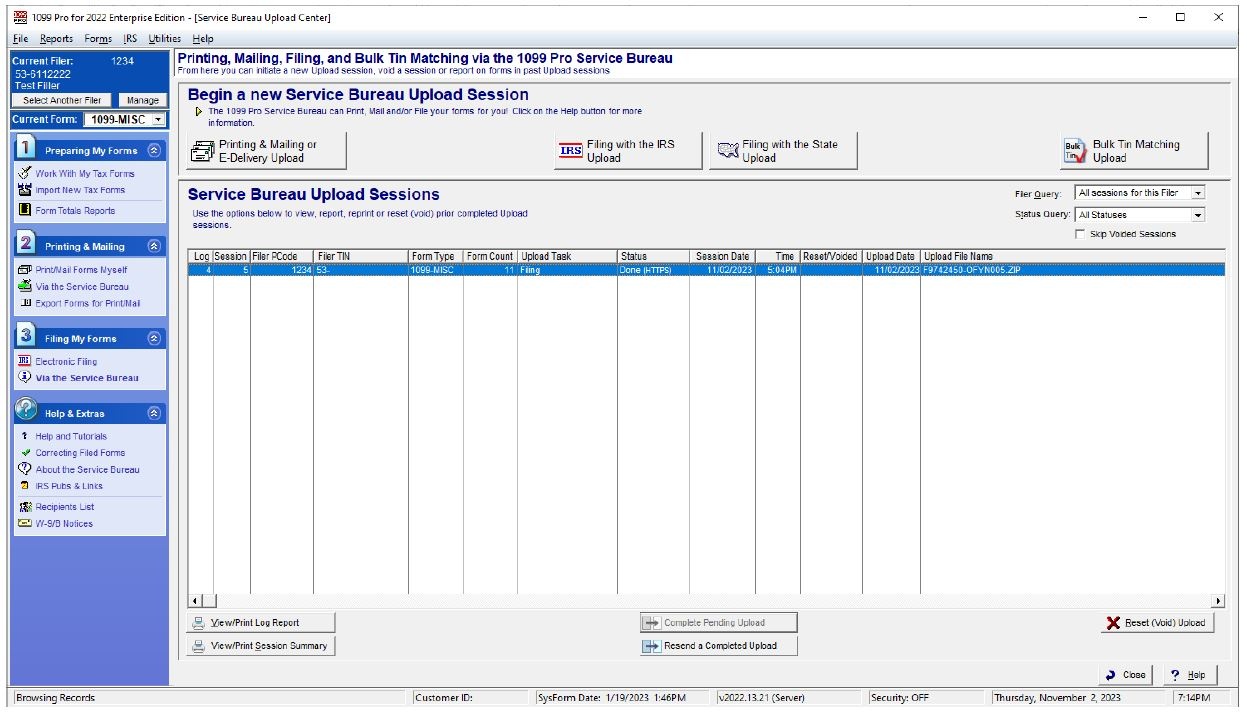
You will now be able to view your uploaded session listed in the Service Bureau Upload Center.
Please take note that the status of the filing session is listed as 'DONE (HTTPS)'.
Your upload form summary will be printed, this will confirm the file was created and successfully
uploaded.
You are done!
A confirmation email will be sent shortly (it may take 24 hours).
Upload forms to Print, Mail and e-File
NOTE: If you have 10,000 or more forms for printing and mailing, a signed Contract and
Postage Deposit are required to perform Print Services. Please email sb@1099pro.com and
add "CONTRACT" in the subject line to receive the contract and deposit invoice
Before you begin, it is important to import your data into the software. Please refer to this tutorial on how to import your data.
When you are ready to upload your file for Print/Mail and IRS filing start by going to the second step labeled 'Printing and Mailing', click on the option 'Via de Service Bureau' to proceed with your upload.

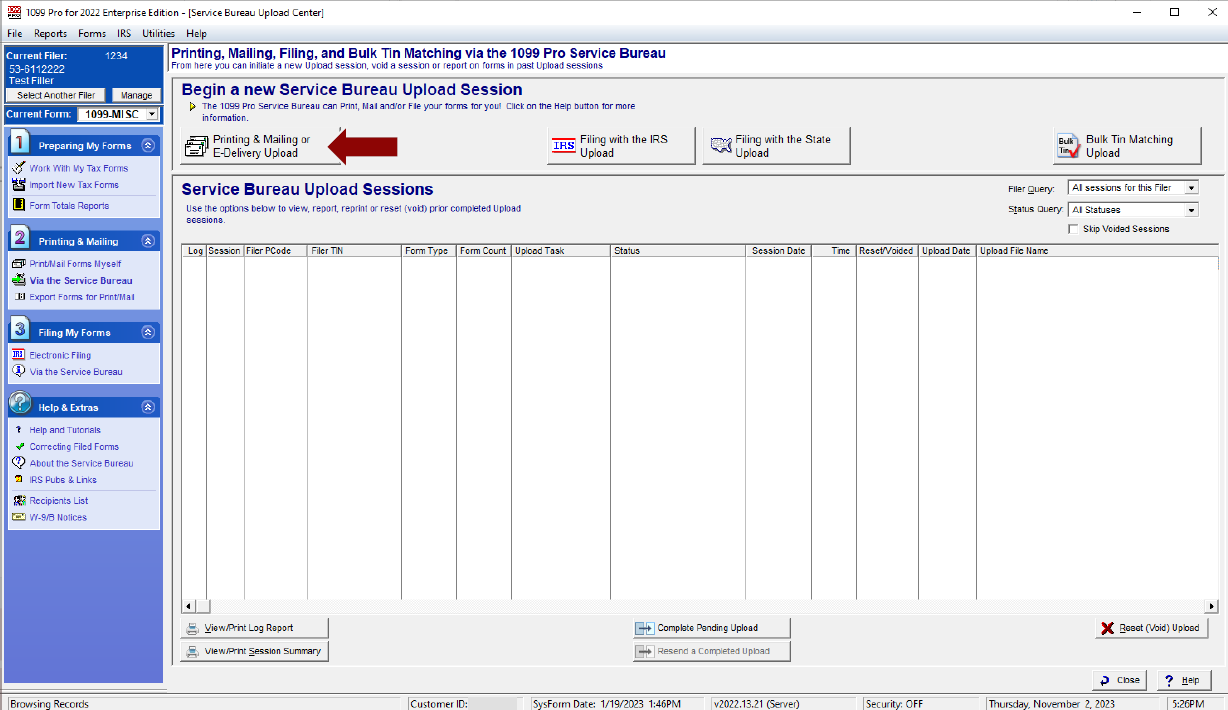
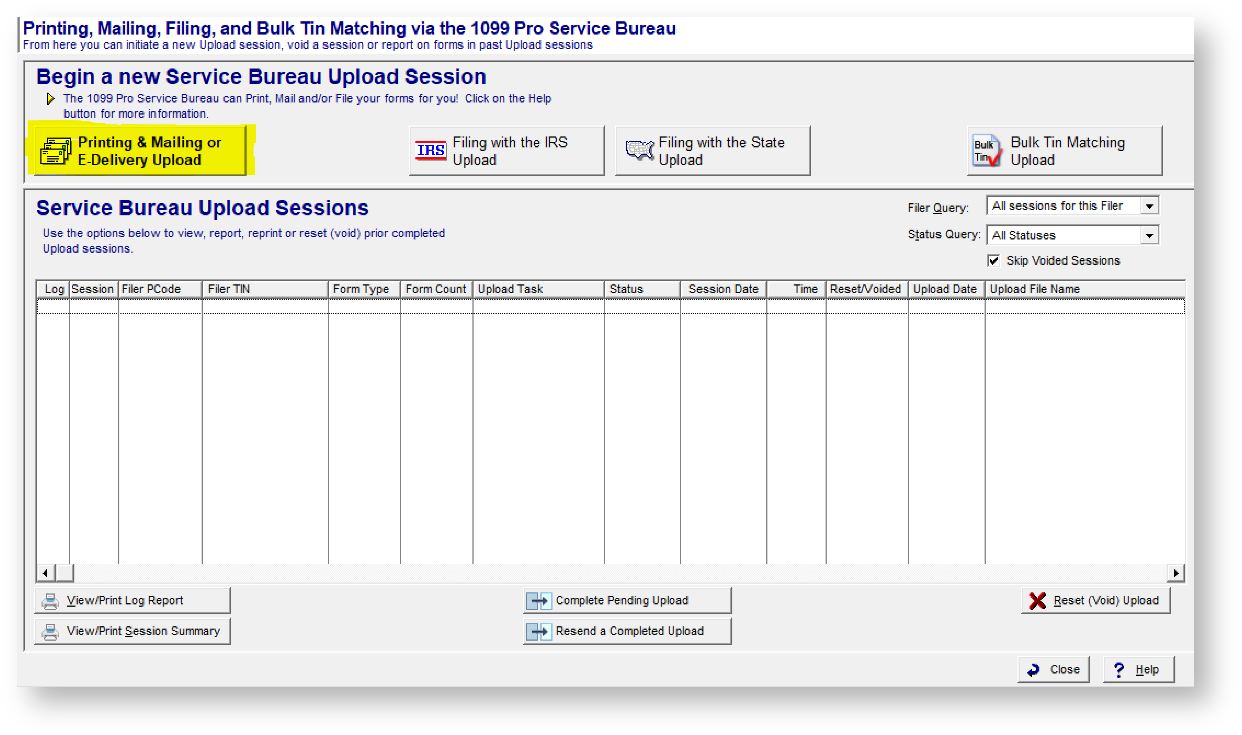
If you wish to utilize the Service Bureau for the printing, mailing, and e-Filing of your forms to the IRS and eligible states, please click on the 'Printing & Mailing or E-Delivery Upload' button.
This will trigger a user-friendly wizard that will guide you through the entire upload process.
 1. Check for Updates: It is essential to ensure that you are using the most up-to-date version of the
software. If there is a software update available, please apply it before proceeding to the next steps.
2. Account Number: The IRS requires that you provide a unique account number on each form. If
you do not already have account numbers, simply press the designated button. For detailed
instructions on how to generate account numbers, you can refer to this video.
3. Click “Begin”: Once you have completed the preceding steps, click the 'Begin' button to continue
with the process.
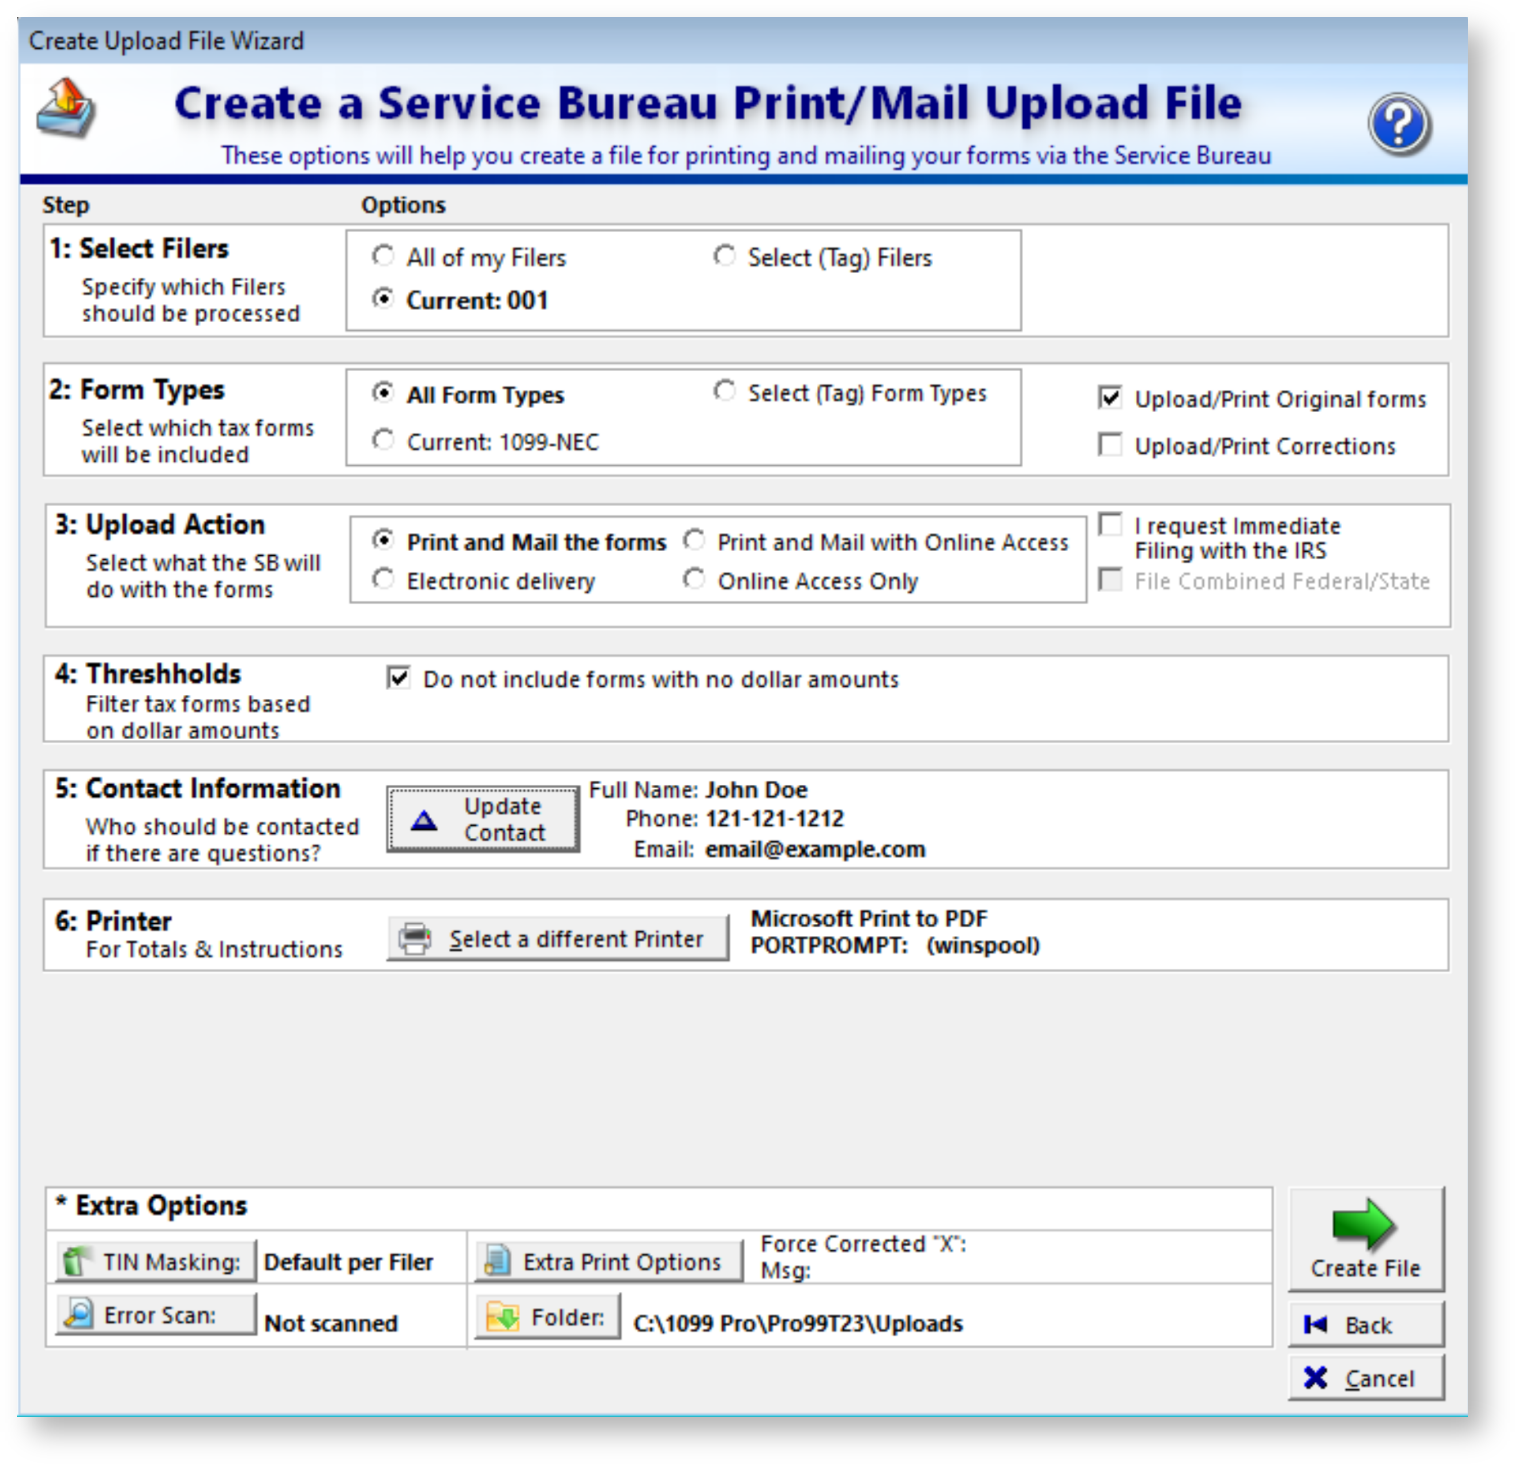
1. Select Filers: Select the filer/s you wish to upload.
2. Form Types: The Service Bureau recommends selecting all of your filers and all form types
if you are ready to send all your records for printing. Also, indicate whether you are sending
originals or corrections.
3. Upload Action: Choose which upload action you will be using; additional information may be required if you choose anything other than "Print and Mail the forms". Ensure you have consulted with our Service Bureau if you are opting for E-Delivery or Web Presentment.
 In this step, you can choose to file the forms with the IRS by clicking on
"I request immediate filing with the IRS".
The "Use CFS for all filers" option is automatically checked for you, enabling participation in the
Combined Federal/State Filing Program. Click here to read more about the Combined Federal/State
Filing Program.
4. Thresholds: If you are only printing and mailing forms with the Service Bureau, you can
choose to skip forms with a $0 USD amount under thresholds. This option ensures that forms
with dollar amounts are not selected in the process.
Please note that this option will not be available if you are using the "Immediate filing with the IRS."
5. Contact Information: In this step, it is essential to update your contact information.
6. Printer: In this option, you need to select the printer for printing both Totals Control and
Instructions.
7. 1099-NEC State Direct: This option allows you to save time by submitting your data for direct
filing to all eligible states simultaneously.
For more information, refer to "1099-NEC State Direct Reporting."
Extra Options
- TIN Masking: This feature helps protect sensitive personal information on recipient copies
of tax forms by replacing the first 5 digits of the recipient TIN with an X. - Error Scans: This option scans your data for column formatting errors.
- The extra print options allow you to print a message on your forms for corrections and copies.
- The folder button enables you to select the location where your
Once you have configured your preferences, click on "Create File."
 1. Review Totals: Click on the "View Control Totals Report" to review the totals match your records. You can save a copy of the report by clicking on the save option within the PDF document.
2. Confirm Totals: Reenter the total number of forms.
3. Transfer Method: Select Your Preferred Upload Method: The Service Bureau recommends using the default option, "Built-In HTTPS Secure Transfer (Default/Preferred Method)" to securely submit your data to the Service Bureau over the internet. If the first option fails due to your computer firewall, you can consider the second option, "Built-In FTP using the internet."
4. Select Printer: You can select PDF to save a copy of the report or you can select a physical Printer.
5. Digital Signature: Enter your full name (first name and last name).
Click on "Upload My File" when you are ready.
Another window will appear, indicating that the file has been successfully uploaded. Click "OK" to proceed. Subsequently, a confirmation sheet will be printed immediately.
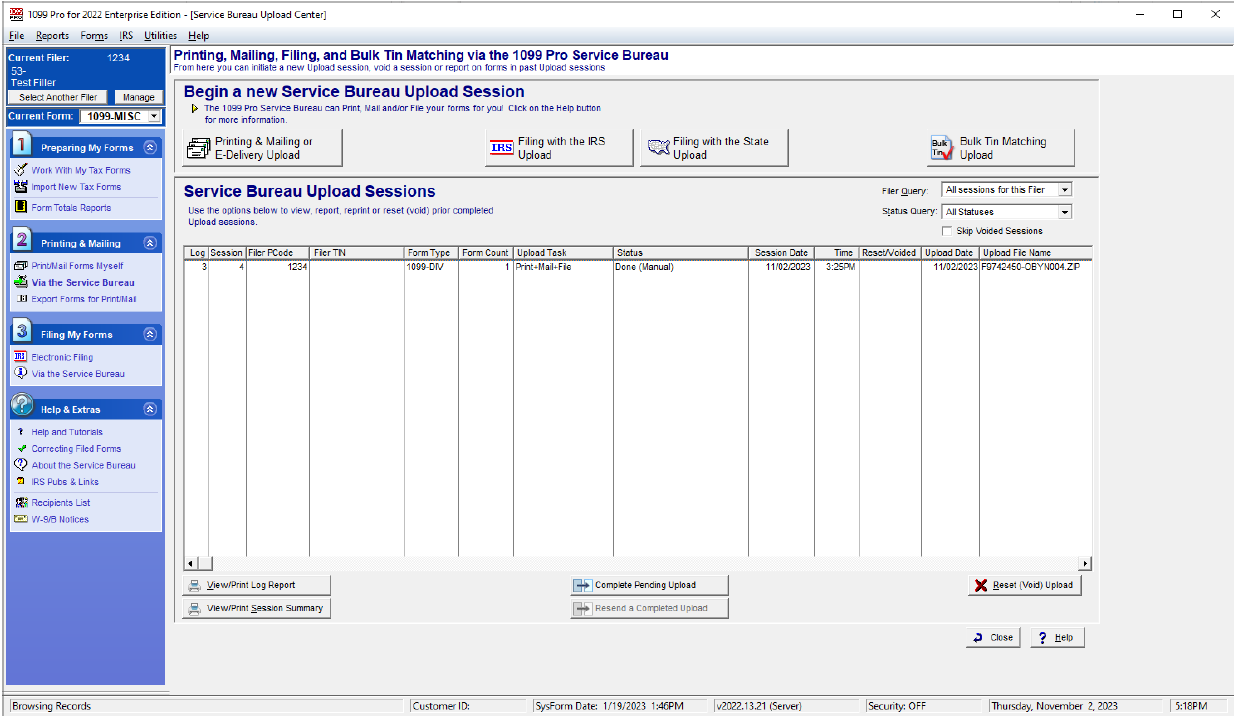
You will now be able to view your uploaded session listed. Please take note that the status of each
filing session is listed as 'DONE (HTTPS)'.
You will also be able to see in the “Upload Task” column the Upload Action that was previously
selected.
Finally, our Service Bureau will confirm via email once your forms have been received and processed.
You have submitted your upload!
Print /Mail and IRS filing only
How to Submit a Bulk TIN Matching Upload
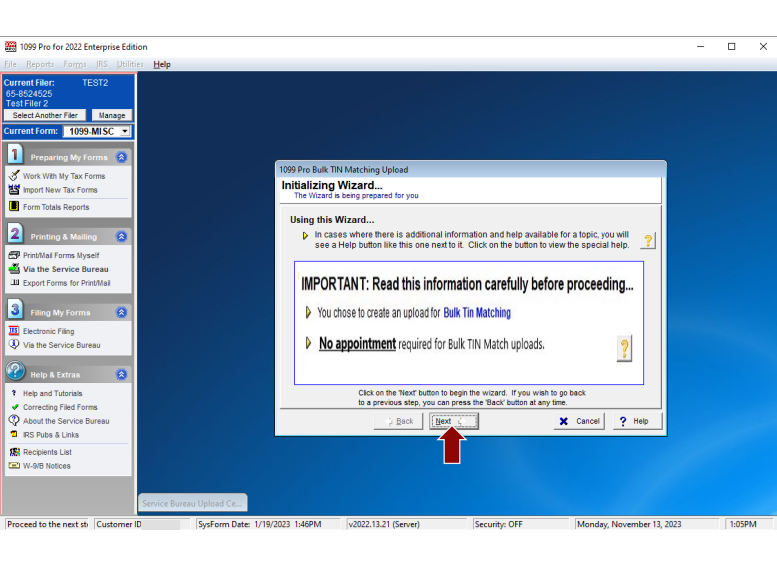
Bulk TIN checking is an essential compliance and risk mitigation service that identifies Recipient Name/TIN mismatches prior to filing with the IRS.NOTE: No appointment required for Bulk TIN Match uploads.
Before you begin, it is important to import your data into the software. Please refer to this tutorial on how to Import.
When you are ready to upload to the Bulk TIN upload.
We start by going to the second step labeled "Printing and Mailing", you should click on the option "Via de Service
Bureau" to proceed with your upload.
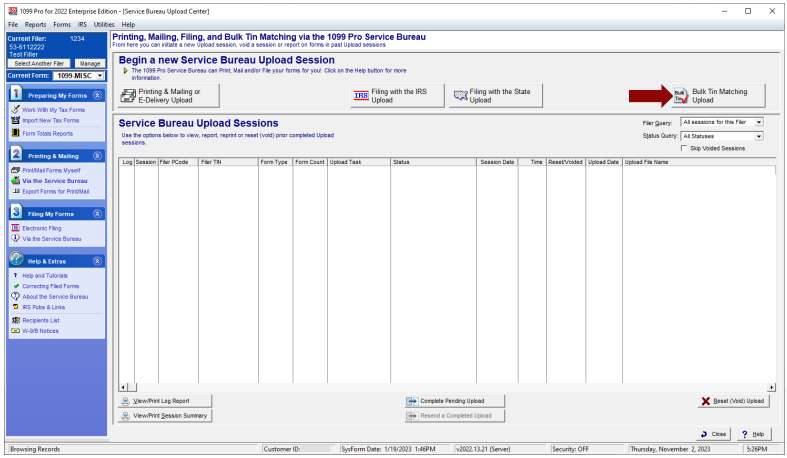
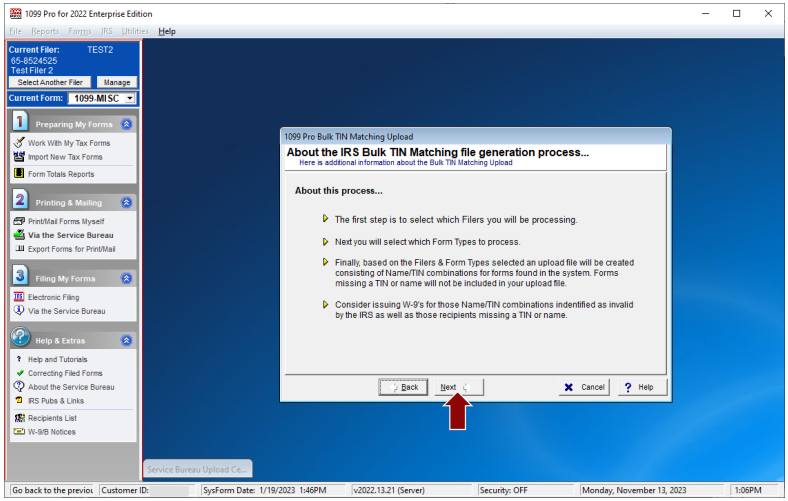
Please click on the "Bulk Tin Matching Upload" button. This will trigger a user-friendly wizard that will guide you through the entire upload process.
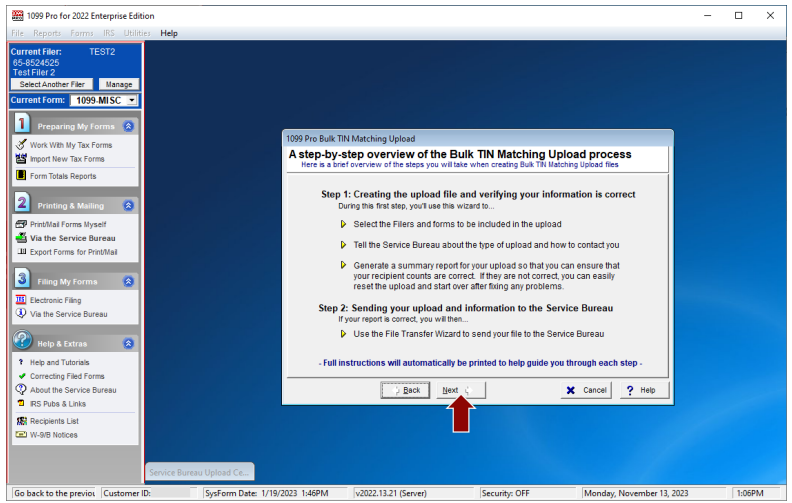
Now, carefully read the next 3 informational screens click on the “Next” button on each screen.
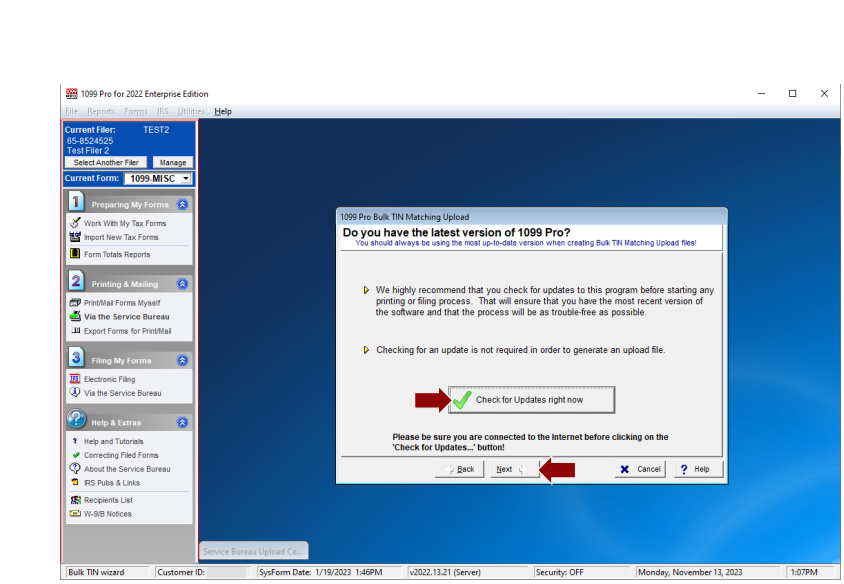
Check for Updates: It is essential to ensure that you are using the most up-to-date version of the
software. If there is a software update available, please apply it before proceeding to the next steps.
After you checked for updates, click on the “Next” button to continue.
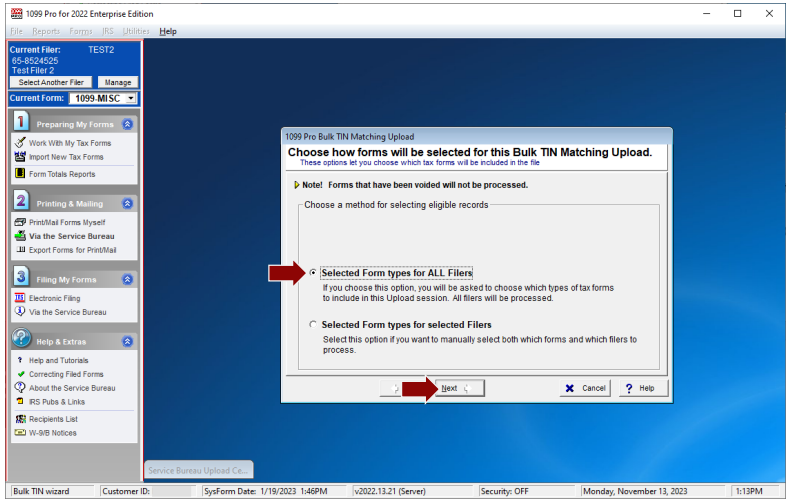
In this screen, you can select which eligible records you want to upload.
You can choose “Selected Form types for ALL Filers” and “Selected Form types for Selected
Filers”.
The Service Bureau suggests selecting “Selected Forms types for ALL Filers”.
Once you have chosen which type of tax form you are filing, this action will combine all filers into
one easy upload.
Click on the “Next” button continue.
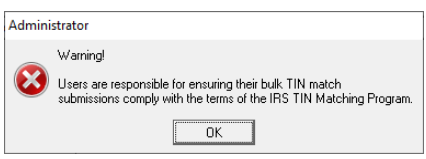
<---Read the warning window carefully.
Then click on the “Ok” button to continue.

On this screen select the form types you want to include in your uploads. For this example,
we will highlight the “1099-MISC” and click on the “Tag” button to select it.
Click on the “Next” button continue.

Please read the top of screen carefully.

The Service Bureau recommends that you leave this option as is.
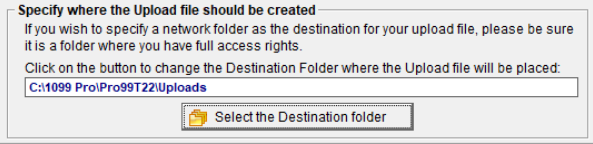
You can specify where the upload file should be created. In almost all cases you will want to save
your upload file to the default location. Click on the “Next” button to continue.
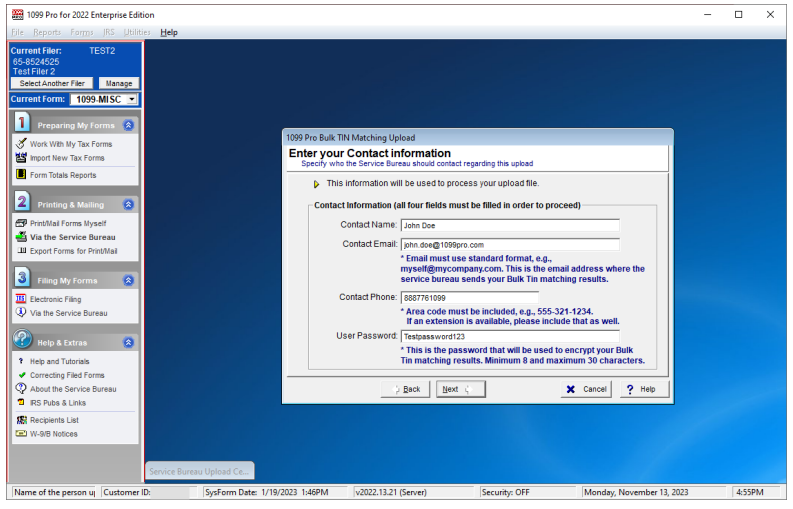
Enter your contact information and create a password.
This password will be used to encrypt your Bulk TIN Matching results.
The password must be a minimum of 8 characters and a maximum of 30.
Important: Note the password down as it will be required to unlock the results file that
is returned to you by 1099 Pro.
Click on the “Next” button to continue
Click on the “Next” button to continue.

Verify your information is correct. Then click on the “Finish” button.
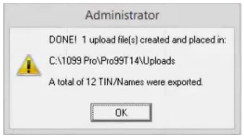
A pop-up window will appear telling you an upload file was created successfully and save to your
selected location.
Click on the “Ok” button.
1. Review Totals: Click on the "View Control Totals
Report", and your report will
appear in a new window.
Confirm the totals displayed on
the last page. Then, click on
"Save Control Totals
Report..." to save a copy of the
report to your chosen location.
2. Confirm Totals: Reenter the number of forms you
plan to upload under step 2.
3. Select Your Preferred Upload Method: The Service Bureau recommends using the default
option, "Built-In HTTPS Secure Transfer (Default/Preferred Method)" to securely submit
your data to the Service Bureau over the internet. If the first option fails due to your computer
firewall, you can consider the second option, "Built-In FTP using the internet."
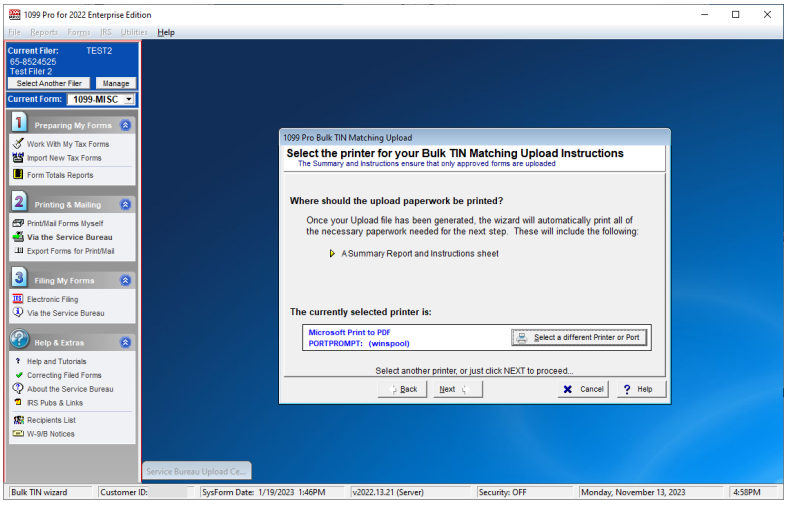
4. Select Printer: Choose the Correct Printer.
5. Digital Signature: Provide your digital signature.
Click on the "Upload my File" button.
A window will appear, indicating that the file has been successfully uploaded.
Click "OK" to continue. Subsequently, a confirmation sheet will be printed immediately
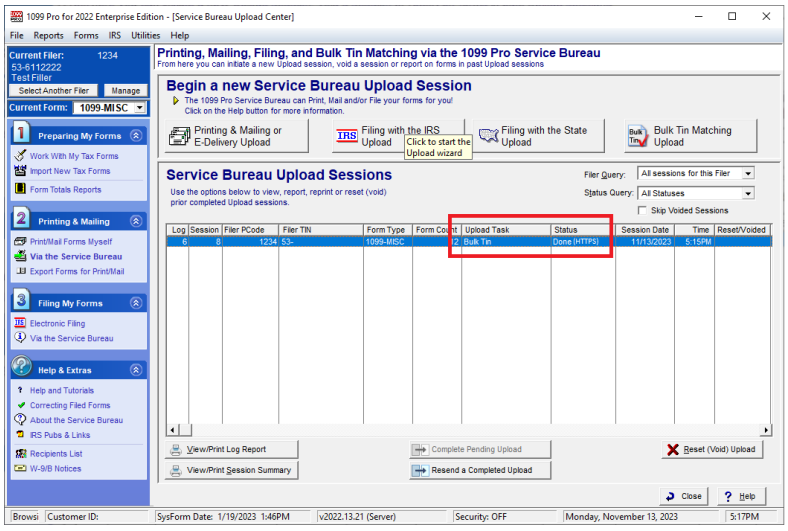
You will now be able to view your uploaded session listed under the Service Bureau Upload Sessions. Please note the status should be "DONE (HTTPS)". This is based on the selected transfer method you have selected.
How do I receive my results?
You will receive an encrypted results ZIP file via email approximately 24 hour turn-around time.
For more information and How to upload a Bulk TIN file video visit our Bulk TIN Match Service page.
Most 1099 Pro software corrections must be processed manually, one-by-one, at the Work With My Tax Forms screen (the exception is Corporate Suite). Watch a video tutorial on corrections, Click here, or view detailed instructions below.
How to File Corrections (Desktop)
The cost to submit eFile Only corrections is $45 per upload. Standard rates apply for Print uploads. Watch a video tutorial on corrections, Click here.
- Correct your forms.
- At the 1099 Pro menu bar
 IRS File Electronically via the Service Bureau.
 - At the Begin a New Service Bureau Upload Session screen, select the "Filing with the IRS Upload" button.
- At the Create a Service Bureau IRS Filing Upload screen:
- In Step 1: Select ALL Filers (if appropriate).
- In Step 2: Select ALL Form Types (if appropriate) and check the "File Corrections" box.

- In Step 3: Select "Original (first) upload for these forms".
- Click "Create File" to continue to the next screen and submit this upload to the Service Bureau.
- In Step 1: Select ALL Filers (if appropriate).
- After successfully uploading your files, you will receive an automated email from the Service Bureau.
For more information on corrections please visit the wiki page.
______________________________________________
![]() If you require further information about this process, please visit our website at
If you require further information about this process, please visit our website at
www.1099pro.com or contact us directly at sb@1099pro.com.
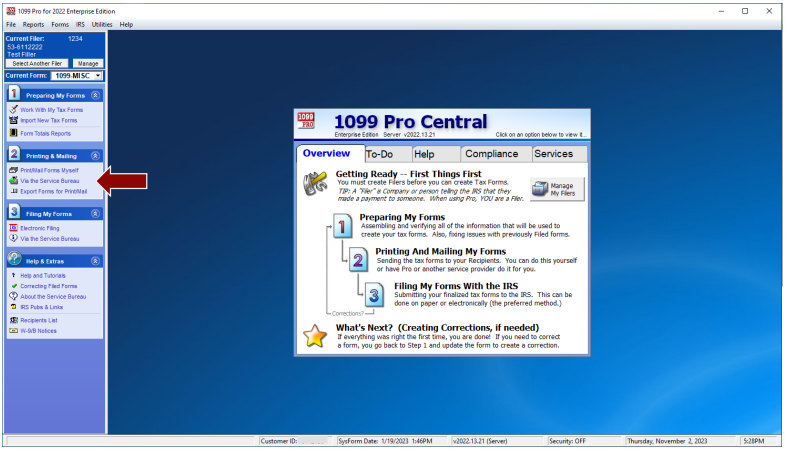
Overview
Content Tools