- Loading...
Service Monitor Installation
Service Monitor is designed to run as a service and monitor the 1099 Pro services. It will email alerts if they are not functioning. To configure it you will need to setup the services to be monitored to run on unoccupied ports. Then configure Service Monitor to monitor those services on the specified ports.
To setup the 1099 Pro Services to run on an unoccupied port add the key “DefaultPort=10080” to the named section of the Pro99CS.INI. You can replace the port 10080 with any unoccupied port. Each Service must run on its own separate unoccupied port. Here are some examples.
For Report Manager:
[ReportMgr]
DefaultPort=10080
For Scheduler:
[SchedMgr]
DefaultPort=10081
If the services are running you will need to restart them for the port change to take effect. If you would like to confirm the service is running on the appropriate port you can open an administrative command prompt and run “netstat -nao” then compare the PID matches the appropriate one in Task Manger.
Step 1: Run it by double clicking on ServiceMonitor.exe from the Pro1099CS folder on the WebUpdate Workstation. Then click on the icon in the taskbar to open the GUI interface. Go to the Actions tab to begin setup configurations.
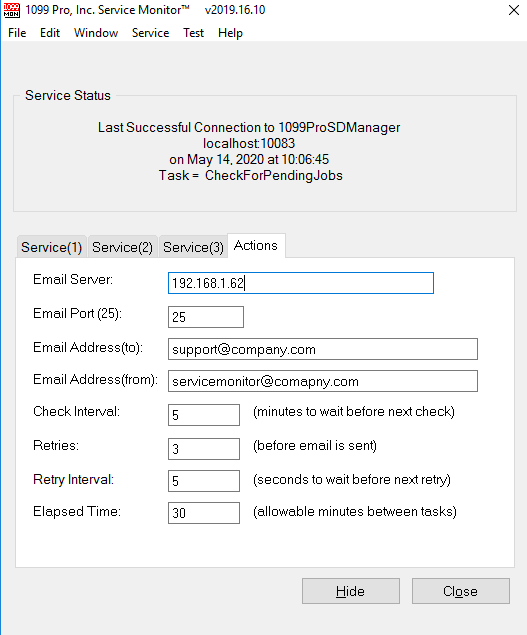
- Specify the email server, port and authentication settings. You can send a test email from the Test menu. It will provide information such as service error message, server, port number, time stamp and a link to the web interface for troubleshooting.

- Check Interval - Specify the frequency in minutes to wait before checking the service again.
- Retries - Specify how many tries to check the service before triggering an email alert.
- Retry Interval - Specify how many seconds to wait before next retry.
- Elapsed Time - Specify in minutes the time to wait to check for new jobs before triggering an email alert that the service may be down.
- In the case of a long processing Job it’s the time it waits for the job to complete before sending the email. The default of 30 minutes is recommended unless you consistently have jobs such as reports that run longer than normal.
Step 2: Setup the services to be monitored. For the first service to be monitored select the Service(1) tab and enter the appropriate information.

- The Service Name can be the actual name of the service or any name to help you identify the service in alert emails.
- The Service Address would generally be localhost or the Name of the computer the service is running on.
- The Service Port would be the port configured above.
Once configured you can use the Test menu to test communication with the service. Repeat on Service(2) and Service(3) tabs for additional 1099 Pro services.
Step 3: Click on the Service menu and install the service monitor as a service so it will constantly run in the background.

After installing as a service you should close service monitor and start the “1099 Pro Service Monitor” service through service manager. To change any settings stop the service monitor service and manually run the ServiceMonitor.exe from the Pro1099CS folder. When done close and start the service, there is no need to remove or install the service again.
Service Monitor via web browser
To access the web interface simply open your browser and in the URL bar go to http://server:portnumber (server - name of machine service is running on, port number - port that service is running through). With this interface you can browse current job status for troubleshooting. It will also identify the software version number after the service.

The Home screen shows the current task, date, time, server and database connections.

*for further assistance please contact your account manager.
Recover Batch File Setup
The following are standard defaults and may differe from your configuration. Please contact support if you need assistance. This feature will restart the windows services if service monitor has detected that the services is in a "stopped" status.
We have included 3 default sample batch scripts in the Pro99CS\Admin folder. Define the Recover batch file in the highlighted section with the entire file name. If you are not using the Recovery batch file, leave this box blank.
Each service tab will this section available for the 3 available 1099 Pro Services: Forms Manager, Report Manager and Scheduler Manager.

Example Batch files:
If you make changes the batch files, it is recommended that you save them as different name.
Example naming:
My_Recovery1.bat Always use extension .bat
The default Scheduler recovery batch file is shown below. The Service "1099ProSDManager' is the default label given. If you configured it differently, please use the same service name in the batch script.
Scheduler_Recover_default.bat
taskkill /F /IM "Scheduler.exe" /T
timeout 2
Net start 1099ProSDManager
Scheduler Check Log
This enhancement is included with 1099 Pro Corporate Suite v2025.12.29. This will continuously check the scheduler log for a 60 minute break or pause in scheduler log entries, indicating a stuck service, even if the service displays "running". It will trigger the batch script to stop the service and restart it.
To configure you will need to add 2 lines to 2 different INI's.
- Pro99CS.INI (located in \Pro99CS\Admin folder)
- add CheckLog=1 under the SchedManager section

- add CheckLog=1 under the SchedManager section
- ServiceMonitor.INI (located in \Pro99CS folder)
- add CheckLog=1 under the section # you have Scheduler configured under in Service Monitor. In this example I have Scheduler configured as Service #3
- IMPORTANT: you must have the Recover Batch File to trigger the service to restart. (See Recover Batch File section above)

Overview
Content Tools